Receiving the client ip when using cert-managers http01 challenge and ExternalDNS
Steffen Bönisch, 15 December 2023
Kubernetes dominates the world of container orchestration. The security of Kubernetes clusters and the applications running on it play an increasingly important role. The effective management of certificates and Domain Name Service (DNS) records is a crucial aspect.
Cloud users often encounter problems issuing certificates when using cert-manager with a cloud load balancer - for example via a NGINX ingress controller - and make the client IP visible to the backend via the proxy protocol at the same time.
This article describes a possible solution for this issue and further explains how to automate the certificate management and the handling of DNS records by using cert-manager and ExternalDNS.
First let’s look at the tools used and how they work and then move on to the installation instructions.
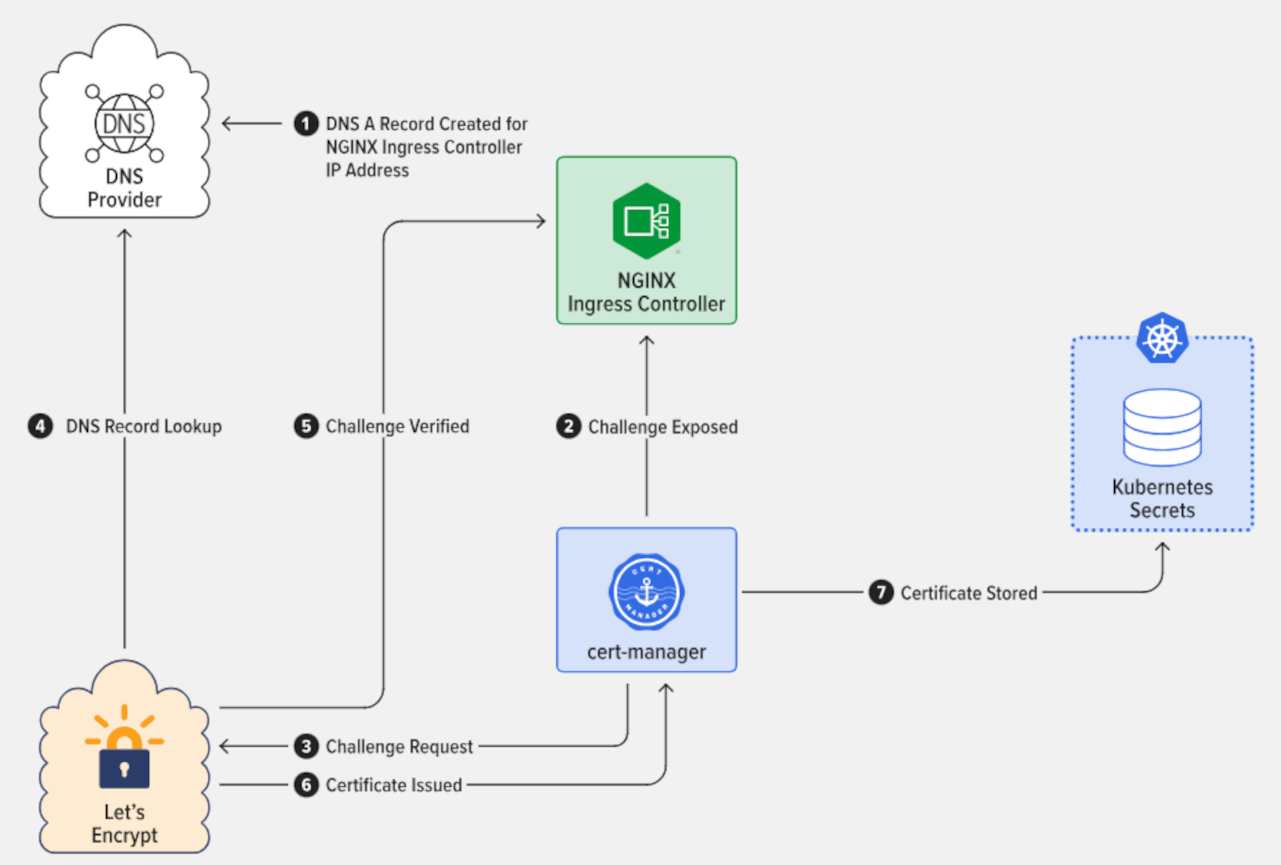
Cert-Manager and Let’s Encrypt
Cert-Manager is an open source certificate management controller for Kubernetes. It automates the life cycle of certificates, including issuance, renewal and revocation, thus eliminating the complexity of certificate management for services provided in the Kubernetes cluster.
One of the essential components of cert-manager are the issuers, which usually are configured immediately after the installation. An issuer is a Kubernetes resource that represents a certification authority (CA) which is able to sign certificates in response to Certificate Signing Requests (CSR).
In cert-manager there are two types of issuers: Issuers and ClusterIssuers that are described on the cert-managers website in more detail.
Cert-Manager supports a number of certification authorities supporting the ACME (Automated Certificate Management Environment) protocol, such as Let’s Encrypt which is used for the example in this article. Certificates issued by ACME certificate authorities are generally trusted on all clients and web browsers worldwide.
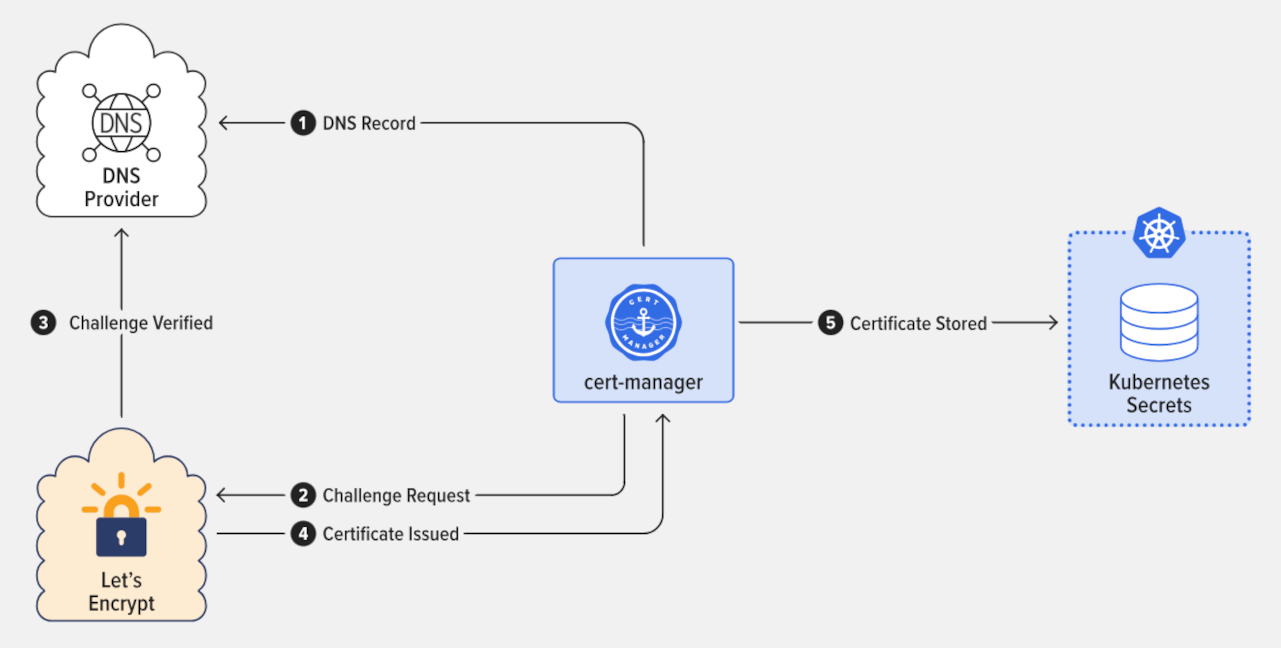
The ACME enforces validations to be passed to ensure that certificate requesters own the domains, identified by the Full Qualified Domain Name (FQDN), the certificates are requested for. Cert-Manager offers HTTP01 and DNS01 ACME challenges to proof the ownership of a domain.
-
HTTP01 challenge: Let’s encrypt tries to reach a file containing a token on a well-known url located on the host the FQDN of the CSR is pointing to.
-
DNS01 challenge: Let’s Encrypt tries to query a DNS TXT record containing a token.
Ingress-shim, as a sub-component of the cert-manager, automatically creates a CSR if ingress resources are annotated.
To start the signing process, cert-manager creates an “order” for the certificate request (including the issuer details) in the context of the selected challenge. Finally the issued certificate is saved as encrypted Kubernetes secret.
ExternalDNS
ExternalDNS automates the creation of DNS records. Services exposed by Kubernetes, for example via the NGINX ingress controller, are synchronized with external DNS providers. This simplifies the management of DNS and keeps the records up to date.
Proxy protocol and hairpin-proxy
The proxy protocol is a network protocol on Transmission Control Protocol (TCP) layer that retains the client IP if the connection is passed through a load balancer or proxy. Without the proxy protocol, backend systems would only know the IP of the proxies/load balancers, as they replace the original IP address with their own. Both proxies/load balancers and the backend systems need to support the protocol.
Problems arise if the HTTP01 challenge of cert-manager is used in conjunction with the proxy protocol - as cert-manager does not support the proxy protocol for now. If the proxy protocol is activated, on both the load balancer (in our case STACKIT yawol load balancer) and the NGINX ingress controller, the self check of the cert-manager fails with an error.
In the context of the HTTP01 challenge, before the ACME server tries to read the file provided, the cert-manager is performing a self check. The self check verifies, if the file can be read locally from the cluster. Here the NGINX ingress controller receives the request for the domain from the cert-manager and expects the proxy protocol in the header. Since the request did not pass the external load balancer and the cert-manager does not add the proxy protocol in the request header. NGINX is unable answer, the self check is failing and no certificates can be issued or signed.
To solve that problem the hairpin-proxy is used. Hairpin-proxy controller modifies the core-dns in that way that all requests, served by the NGINX ingress controller, are first routed to the hairpin-proxy which adds the proxy protocol to the TCP header section. Now NGINX recognizes the proxy protocol in the header and handles the self check request properly. This allows the signing of the certificate requests.
Installation and configuration
To reproduce the issue with cert-manager and the proxy protocol the following section describes how to set up the components using STACKIT Kubernetes Engine (SKE) and Google DNS.
A simpler and STACKIT native way is described at the end of the article.
Installation of cert-manager:
kubectl apply -f https://github.com/cert-manager/cert-manager/releases/download/v1.13.2/cert-manager.yaml
Deploy the cluster issuer
kubectl apply -f 01_clusterissuer.yaml
01_clusterissuer.yaml
apiVersion: cert-manager.io/v1
Kind: ClusterIssuer
metadata:
  name: letsencrypt
spec:
  acme:
    # You must replace this email address with your own.
    # Let's Encrypt will use this to contact you about expiring
    # certificates , and issues related to your account.
    Email: <email-address>
    server: https://acme-staging-v02.api.letsencrypt.org/directory
    #PRD server: https://acme-v02.api.letsencrypt.org/directory
    privateKeySecretRef:
      name: letsencrypt
    solvers:
    - http01:
        ingress:
          class: nginx
Besides the productive ACME server, Let’s Encrypt offers a staging server for testing purposes. To interact with the ACME server, a secret is generated with a private key and used as “privateKeySecretRef” in the YAML file which is located in the cert-manager namespace by default.
Setting up a service account for ExternalDNS using the example of Google DNS
- Start Google Console
- Create service account
gcloud iam service-accounts create <external-dns> --display-name "Service account for ExternalDNS on GCP"
- Authorize service account for DNS
The ProjectID can be found in Google Project Settings. The FQDN of the service account can be found in the “Service Accounts” menu.
gcloud projects add-iam-policy-binding <projectid> --role='roles/dns.admin' --member='serviceAccount:<service account name>@<gcp-fqdn>'
- Create and save service account keys
gcloud iam service-accounts keys create credential.json --iam-account <serviceaccount@fqdn>
- Download the credential file from the Google Console
Installation of ExternalDNS
kubectl create namespace external-dns

kubectl -n external-dns create secret generic external-dns --from-file=credentials.json

helm repo add bitnami https://charts.bitnami.com/bitnami
helm repo update
helm install external-dns --namespace external-dns --values values.yaml bitnami/external-dns
Content of values.yaml
## Monitor these resources for new DNS records
sources:
  - service
  - ingress
## Specify dns provider
provider: google
# Specify the Google project (required when provider=google)
# You'll need to create this secret containing your credentials.json
google:
  project: "<projectid>"
  serviceAccountSecret: "<ServiceAccountName>"
## List of domains that can be managed. Should be managed by Google Cloud DNS
domainFilters: ["xxx.stackit.cloud"]
# These help tell which records are owned by external-dns.
registry: "txt"
txtOwnerId: "k8s"
## ensure RBAC is enabled
rbac:
  create: true
  apiVersion: v1
This yaml extract is limited to the essentials and needs to be adapted if required
Installation and configuration of NGINX ingress controller
helm repo add ingress-nginx https://kubernetes.github.io/ingress-nginx
helm repo update
helm install ingress-nginx ingress-nginx/ingress-nginx --namespace ingress-nginx --create-namespace -f 02_values_ingresscontroller.yaml
Content of 02_values_ingresscontroller.yaml
controller:
  service:
    annotations:
      yawol.stackit.cloud/existingFloatingIP: "<external-ip>"
      yawol.stackit.cloud/replicas: "1"
      yawol.stackit.cloud/tcpProxyProtocol: "true"
The proxy protocol on the STACKIT yawol load balancer is activated with the annotation “tcpProxyProtocol”.
Verify installation and configuration
kubectl describe service ingress-nginx-controller -n ingress-nginx
Activation of the proxy protocol on the NGINX ingress controller using a configmap
kubectl apply -f 03_nginx_ingress_configmap.yaml
03_nginx_ingress_configmap.yaml
apiVersion: v1
kind: ConfigMap
metadata:
  name: ingress-nginx-controller # name of ingress controller
  namespace: ingress-nginx
data:
  use-forwarded-headers: "true"
  use-proxy-protocol: "true"
Settings can be verified with the following command
kubectl exec -it -n ingress-nginx <ingress-controller-pod> -- cat /etc/nginx/nginx.conf |grep 'use_forwarded_headers\|use_proxy_protocol'
Installation of NGINX web server
In order to verify if the client IP is forwarded and the certificate is issued a NGINX webserver is deployed.
kubectl apply -f 04_nginx_sample.yaml
04_nginx_ sample.yaml
apiVersion: apps/v1
kind: Deployment
metadata:
  name: nginx-deployment
  namespace: ingress-nginx
spec:
  selector:
    matchLabels:
      app: nginx
  template:
    metadata:
      labels:
        app: nginx
    spec:
      containers:
      - name: nginx
        image: nginx: stable-alpine
        ports:
        - containerPort: 80
---
apiVersion: v1
Kind: Service
metadata:
  name: nginx-svc
  namespace: ingress-nginx
spec:
  ports:
  - port: 443
    targetPort: 80
    protocol: TCP
    name: http
  selector:
    app: nginx
This yaml extract is limited to the essentials and needs to be adapted if required
Deployment of the ingress configuration
kubectl apply -f 05_ingress_config.yaml
05_ingress_ config.yaml
apiVersion: networking.k8s.io/v1
child: Ingress
metadata:
  Name: ingress-external-dns-cert-mgr
  namespace: ingress-nginx
  annotations:
    cert-manager.io/cluster-issuer: letsencrypt
    acme.cert-manager.io/http01-edit-in-place: "true"
    nginx.ingress.kubernetes.io/force-ssl-redirect: "false"
    nginx.ingress.kubernetes.io/ssl-redirect: "false"
    nginx.org/listen-ports-ssl: "443"
spec:
  ingressClassName: nginx
  tls:
  - hosts:
    - xxx.stackit.cloud
    secretName: xxx-stackit-cloud
  rules:
  - host: xxx.stackit.cloud
    http:
      paths:
      - path: /
        pathType: Prefix
        backend:
          service:
            name: nginx-svc
            port:
              number: 443
This yaml extract is limited to the essentials and needs to be adapted if required
The ingress configuration also contains the annotation for the cert-manager, which ingress-shim uses to automatically create the certificate request.
Verification of DNS records by ExternalDNS
kubectl logs -f <external-dns-pod> -n external-dns | grep <domain name>
The DNS entries should have been created successfully.
Verify if the certificate was issued
kubectl get certificates -A
The status is set to “False” and the certificate was not signed successfully.
Troubleshooting
kubectl describe challenge <challengename> -n ingress-nginx
The challenge contains the described self check error: “Failed to perform self check”
As described before, the hairpin-proxy is required to add the proxy protocol header to the traffic between the cert-manager and the NGINX ingress controller.
For SKE we use a fork of the hairpin-proxy from our repository: https://github.com/stackitcloud/hairpin-proxy.git
kubectl apply -f https://raw.githubusercontent.com/stackitcloud/hairpin-proxy/master/deploy.yml
The deployment of the hairpin-proxy needs to be adapted to our NGINX ingress controller. This is done by patching the deployment:
kubectl patch deployment hairpin-proxy-haproxy -n hairpin-proxy -p '{"spec":{"template":{"spec":{"containers":[{"name":"main","env":[{"name":"TARGET_SERVER","value":"ingress-nginx-controller.ingress-nginx.svc.cluster.local"}]}]}}}}'
Now the orders, challenges and the certificate in the status “Invalid” can be deleted. Cert-Manager will now restart the certificate process and issue a valid certificate.
Finally, the logs of the NGINX web server can be checked to see that the client IPs are passed on.
kubectl logs -f <nginx-webserver-pod> -n ingress-nginx
Conclusion:
Cert-Manager and ExternalDNS are powerful tools to streamline the process for creating DNS records and creating and renewing TLS certificates.
This article shows how to simplify certificate and DNS management and how to make the client IPs visible in the backend behind a proxy/load balancer by using proxy protocol and the hairpin-proxy despite of the cert-manager’s HTTP01 challenge.
As already mentioned the installation can be simplified by using the STACKIT webhooks for ExternalDNS and cert-manager in conjunction with STACKIT DNS.
Using the DNS01 challenge the complexity can be reduced even more by using the proxy protocol without the hairpin-proxy.
Detailed instructions on how both cert-manager and ExternalDNS can be used with STACKIT Kubernetes Engine (SKE) and STACKIT DNS can be found in our STACKIT knowledge base:
- How to use ExternalDNS with STACKIT DNS
- How to use STACKIT DNS for DNS01 to act as a DNS01 ACME Issuer with cert-manager
Source references:
